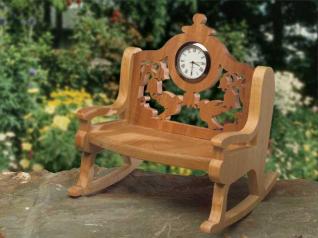
A quick project that makes great use of the 1 3⁄8″-diameter clock inserts
Embellish a whimsical doll chair with a classic summer design
Cut by Bernie McKruit of the Blazing Blades of Western PA
Hummingbirds are one of the most recognizable signs of the harvest season. This rocking chair project looks great on an end table or a windowsill—or anyplace else that needs a little burst.
Step 1: Copy the pattern. Then transfer it to the material using your method of choice.
Step 2: Drill blade-entry holes for the interior cuts on the clock seat back. Try to keep the holes close to the lines to extend the life of your blades.
Step 3:Cut out the inside fretwork using the #3 blade. Work from the center out, cutting the most delicate pieces first.
Step 4: Cut the hole for the clock insert. If you have a 1 3⁄8″-diameter Forstner bit, drill the hole where indicated on the pattern. If you don’t have that size bit, drill a blade-entry hole near the line and cut out the hole with the scroll saw. Test fit the clock insert, and sand off any tight spots.
Step 5:Cut the final outline of the clock seat back using the #5 blade.
Step 6: Cut the bottom and sides to shape. Sand off any rough edges or burrs from the cutting.
Step 7: Apply your finish of choice to the fretwork, seat, and sides. After the finish dries, spray the entire fretwork and base with clear lacquer.
Step 8:Use wood glue to attach the sides to the seat and back (where the clock is located). Drill holes slightly smaller than your finishing nails where indicated on the pattern and drive the nails into place to secure the pieces while the glue dries.
Materials:
- 3/8″ x 4½” x 5″ hardwood of choice (clock seat back)
- 3/8″ x 3½” x 5″ hardwood of choice (seat)
- 3/8″ x 5½” x 10″ hardwood of choice (2 sides)
- 1 3/8″-diameter clock insert
- Various grits of sandpaper
- Finish of choice
- Clear spray lacquer of choice
- Wood glue
- #18 x 5/8″ finishing nails
Tools:
- #3 & #5 skip-tooth blades or blades of choice
- Various small drill bits
- Hammer
Attachments
Hummingbird Rocking Chair Clock pattern