By Joe and Paige Paisley
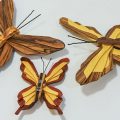
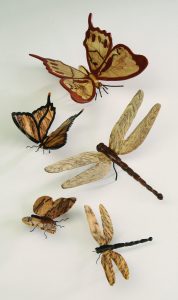
We designed these butterflies and dragonflies to use all of the small but highly figured pieces of wood we had lying around our shop. You can’t just throw them in the fireplace, and these little critters are great items to sell or give away. We hope this project helps you empty that box of little scraps of wood you have been saving.
Instructions:
- Choose the stock. The wood might be from a knot or a knee from a tree limb—but use highly-figured wood. Resaw the wood to between 1/16″ and 1/8″ thick.
- Keep the slices in order. When you have sliced the wood, you will notice that you have a matched “flitch” or set of pieces. Keep this in mind when you are stacking your wood so that your butterfly wings are matched.
- Assemble four pieces of wood for stack cutting. Then attach them together with glue, pin nails, or dowels. This stack will give you at least two butterflies. If you attempt more than four layers at 1/16″ to 1/8″ thick, it will be hard to fit the pieces together. Study the pieces of wood and choose the best grain pattern before attaching the pattern in place, using your spray adhesive of choice.
- Cut out the wings using a #2 blade. A zero-clearance table is also useful; that way the parts fly up instead of down, and you can see which way the parts are going when they hit the floor. I also have a catch-all under the table; it catches 90% of the pieces that come through. Keep all the parts in order as you cut them so the grain will all go in the same direction.
- Separate the pieces. Spread 2″-wide clear tape out over an area, sticky side up, to collect the parts. Place each wing on the tape, and interchange the pieces. Mix up the colors to form a unique pattern for each insect. When you have all the pieces laid out, mix up a small amount of a clear five-minute epoxy or a microbed epoxy, with a toothpick. Microbed epoxy gives you a dark line. Cover the entire wing, and work it into the cracks quickly, because the epoxy sets up fast.
- Sand the wings. Use your method of choice (power carver, palm sander), but use caution. The glue will heat up if you power sand it, and the heat will weaken the epoxy joints. You want to remove any excess epoxy, but you don’t want the pieces to fall apart.
- Cut the insect bodies. Choose a body color that will complement the wings of the insect. The body of your insect is 1/8″ or 1/4″ depending on the size of your insect. The body is cut on a scroll saw and rounded with a power carver or sander. When the body of your insect is completed, glue the wings to the body with a five-minute epoxy.
- Add the arms, legs, and antennae. I use wire from a wire wheel or a thin gauge wire bent into shape with needle-nose pliers for the arms, legs, and antennae. You need two for the antennae, four for the legs, and two for the arms. Drill the holes for the wire. Glue the wire in with epoxy. Sand off the excess epoxy. Paint the wire with black or brown enamel craft paint.
- Finish the project. Use Deft semi-gloss or gloss laquer spray or your finish of choice. You can use this as your completed project, or you can mount it on a magnet or a little box. They make great gifts and sell well at craft fairs and gift shops.
Materials:
Wood scrape ranging in size up to: 3/4″ x 4″ x 4″ (19mm x 102mm x 102mm)
Spray adhesive, temporary-bond
Tape, clear plastic: 2″ (51mm)-wide
Epoxy, five-minute or microbed
Toothpicks
Finish
Sandpaper: assorted grits
Wire: 20 gauge or 3” wire wheel (arms, legs, and antennae)
Tools:
Band saw (for resawing for thickness)
Scroll saw blades: #2 reverse-tooth
Pliers, needle nose
Power carver or sander (optional)
Click below for butterflies and dragonflies pattern.