 Everyone wins when you cut and donate these simple flowers
In Scroll Saw Woodworking & Crafts Spring 2012 (Issue 46) Tom Kantos introduces readers to the simple projects he cuts and donates to schools and groups. Scroll down for basic instructions and the pattern to make your own giving garden.
Making Mother’s Day Flowers
Delight children and adults alike with this simple, inexpensive, and fun project. You can also make flowers for other occasions, such as weddings (painted white), fiftieth birthdays (black), or breast cancer awareness (pink). Use your imagination and have fun.
Getting started
I always start a project by checking with the teacher. I send a note with a brief description of the project, the teacher’s responsibilities, and supplies the school should furnish. I also ask how many children are in the class and prepare several extra sets just in case.
I usually suggest that the teacher spray a coat of flat white paint on the cut-outs before the kids start painting. I suggest that each child sign and date the completed project to add to the memory in later years.
Box-Making Projects | 3D Patterns for the Scroll Saw
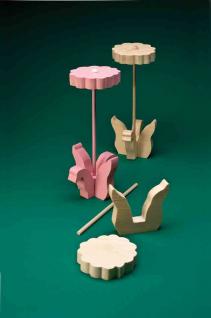
Cutting and assembling the flowers
First, transfer the pattern to a piece of scrap plywood, cardboard, or stencil plastic and cut templates. Trace the templates onto the project blanks, avoiding any knots or blemishes that will restrict painting. Cut all of the pieces and lightly sand them.
Match sets of leaves together, ensuring that the assembled base sits flat without wobbling. Use a drill or drill press and a 1/4″ (6mm)-diameter Forstner bit to drill through the center of the top piece in the assembled leaf base and 1/4″ (6mm) into the bottom piece. Clean the sawdust from the drilled hole. Separate the leaf pieces, place a couple drops of glue in the holes in both pieces, reassemble the base, and push a dowel through the top piece and into the bottom piece. If necessary, tap the dowel with a hammer to seat the two pieces and stem together.
Check the flower head for blemishes; if there are any, make that side the bottom of the flower. Use a 1/4″ (6mm)-diameter Forstner bit to drill a 3/8″ (10mm)-deep hole in the center of the flower bottom. Use a 3/8″ (10mm)-diameter Forstner bit to drill a 1/4″ (6mm)-deep hole in the center of the flower top. Do not attach the flower to the dowel stem—it is easier for children to paint the flower in pieces. When the kids paint the flowers, expect imagination, not perfection. You simply cannot believe what some of the children do with these projects.
Provide a bottle of wood glue so the teacher can assemble the projects after the children paint the flowers. Show them that the button goes in the larger hole in the top of the flower and the stem goes in the smaller hole in the bottom of the flower. It may be helpful to mark the inside of the larger hole with an X so the children know which side will face up.
Materials & Tools:
Materials:
Materials for one flower
• Pine or scrap wood, 3/4″ (19mm)-thick: flower, 4 1/2″ x 8 1/2″ (114mm x 216mm)
• Scrap plywood, cardboard, or stencil plastic: template, 4 1/2″ x 8 1/2″ (114mm x 216mm)
• Dowel, 1/4″ (6mm)-diameter: 8″ (203mm)
• Wooden button: 3/8″ (10mm)-diameter
Tools:
• Blades: #5 or #7 reverse-tooth
• Drill or drill press and Forstner bits: 1/4″ (6mm)- and 3/8″ (10mm)-diameters
• Hammer (optional)
• Pencil or pen
• Sandpaper
• Wood glue
Attachments
Giving Garden Flower Pattern