 Scroll a quick and easy table decoration
By John A. Nelson
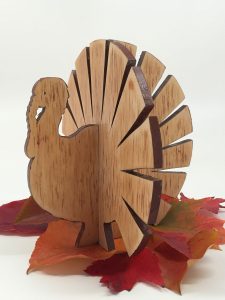
What is Thanksgiving without a turkey? Not only can your family can enjoy this one all season, but you don’t have to worry about burning it! Older kids can help cut the turkey and little ones can add color to the wooden feathers.
Three Ways to Make the Turkey
To make a turkey that you can paint or color on, simply print the patterns and attach them to 1/4″ (6mm)-thick Baltic birch plywood. Drill a small hole for the eye, and drill a blade-entry hole at the neck. Cut the neck detail first, and then cut the perimeter of each piece. Use mineral spirits if necessary to remove the pattern and sand the edges to remove any roughness. Paint or color as desired, and then seal the project with clear polyurethane or spray shellac.
To make a hardwood turkey, follow the same steps but omit the painting or coloring.
To accent the edges of the turkey with paint, as shown, first sand the plywood and wipe it clean. Apply two or three coats of clear polyurethane to all sides, letting the spray dry between coats. Buff the pieces with #0000 steel wool and wipe clean. Spray the back of the pattern with adhesive and apply it to one side of the wood; glue a blank piece of paper to the back. Use more adhesive than normal, because the paper needs to stick tightly. Drill the holes and cut the patterns. Before removing the patterns, spray all of the cut edges with red paint and let dry. Then, remove the pattern and paper, using mineral spirits if necessary. If any paint bled under the paper, remove it with steel wool. Use the steel wool or sandpaper to remove any rough edges.
Cutting Tips
• Before cutting the slots, measure the thickness of your wood. Adjust the widths of the slots so they exactly match the wood thickness. This ensures a secure fit when you assemble the turkey.
• Stack cutting: To cut two or more turkeys at once, stack the pieces of wood and either wrap the stack securely with masking or packaging tape or glue the pieces together in the waste areas. Attach the pattern to the top of the stack.
Materials & Tools:
Materials:
Baltic birch plywood or hardwood, 1/4″ (6mm) thick: 2 each 6-1/2″ (165mm) square
Spray adhesive
Sandpaper
Clear polyurethane or spray shellac
Steel wool: #0000 (optional)
Blank paper (optional)
Spray paint: red (optional)
Mineral spirits
Tools:
Scroll saw blades: #5
Drill and bit: 1/32″ (1mm)


