 The Perfect Housewarming Gift.
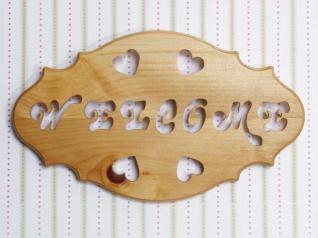
What to give the new homeowner you know has never been easier. This simple yet elegant plaque is the perfect gift. The instructions in this article start with the cutting of the plaque shape. For a real time saver, just purchase an 8″ x 131/2″ French Provincial signboard at your local craft shop.
Those new to scrolling will find this project easy to make, even with a pin-end saw. And the finishing options are endless: add woodburned detail or paint to match any décor. You can even put a contrasting background behind it. You’re limited only by your imagination.
Step 1: The design of the pattern is such that you can enlarge or reduce it to the desired size. Make sure you alter the starting stock, allowing about a 1/2″ margin along the outside edge of the pattern. If you choose to use wood thinner than 3/8″, you’ll want to glue the cutout on some type of backing board to help give stability to the lettering. Choose a contrasting color for the backing board for maximum appeal.
Step 2: Adhere the pattern to the wood. Spray the back of the pattern with temporary bond spray adhesive; be certain to follow the manufacturer’s instructions on the spray can.
Step 3: Make the blade entry holes. Use the 1/16″-diameter bit to drill the blade entry holes for each letter and for each heart. If you’re using pin-end blades, you’ll want to use the 1/8″-diameter bit. Insert the blade in the first hole and cut it out. For better control, beginners may want to use the #5 blade.
Step 4: Add the decorative edge. This step is optional. A routed edge always adds a touch of class to plaques and frames.
Step 5: Sand the board. A pad or a hand sander with 100-grit sandpaper removes tear out from the blade and prepares the wood’s surface to accept the spray finish or paint. Wipe away the sawdust with a tack rag. If you wish to add a backing board, glue it to the signboard.
Step 6: Attach the hanger. There are many different hangers available at your local arts and crafts store. You’ll want to attach the device to either the signboard or the backing board, if you elected to use one. Do be careful to place the hangers on the plaque so the correct-reading words are on the opposite side. I’ve been in a hurry to complete the project and have mistakenly placed the hangers on the front side.
Step 7: Apply the finish. You may choose to use a clear coat, as I’ve done with the project featured in this article. But the choice is completely up to you.
Materials:
- 3/4″ x 9″ x 141/2″ pine
- Temporary bond spray adhesive
- Sandpaper, 100 grit
- Tack rag
- Clear spray finish
- Hanging device
Tools:
- Scroll saw with at least 16″ throat depth
- #5 reverse tooth or #2 reverse tooth blade
- Drill or drill press with 1/16″-diameter bit or 1/8″-diameter if using pin-end blades
- Router and decorative bit
Attachments
Welcome Plaque Pattern