Layered inlay coasters made with angled cuts
By Gary MacKay
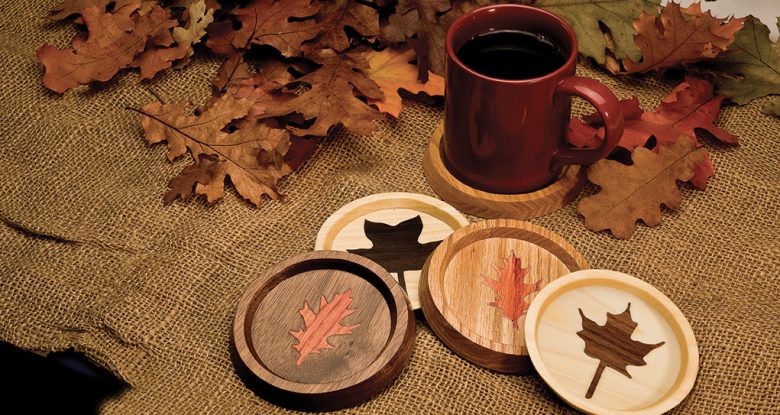
The beauty of these attractive inlay coasters is that each one requires only three cuts. You can create an entire set in an afternoon. They make great gifts or craft show items.
Living near the woods, I have raked my share of leaves in the fall. I was surprised to find that I could identify only four out of 12 common hardwoods by looking at the leaves. So I designed these coasters to show off the leaves of some of the more common North American hardwoods.
The technique is easy and the simplicity of the project makes the coasters extremely versatile. Use stains or dyes to add vibrant fall colors to the leaves or choose alternate designs such as sports logos or a holiday theme for personalized gifts.
The coasters are cut in two separate layers. The bottom layer contains the inlay design. The first cut on the top layer produces the inside rim, the second cut is made with the bottom layer stacked underneath to produce a smooth angled perimeter. The perimeter angle can be cut to slope in or out.
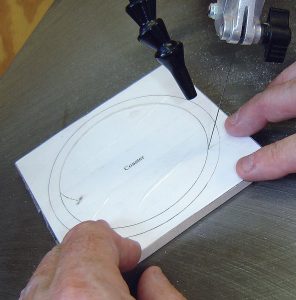
Make several copies of the coaster, test inlay, and leaf patterns. Use double-sided tape to attach the inlay stock to the coaster stock. Draw a line from corner to corner on the inlay stock to determine the center of the wood. Stick a pin through the center of the leaf pattern. Apply spray adhesive to the back of the pattern and use the pin to position the pattern in the center of the inlay stock. Cover the pattern with clear packaging tape to lubricate the blade.
Making the Autumn Leaves Coasters
 |
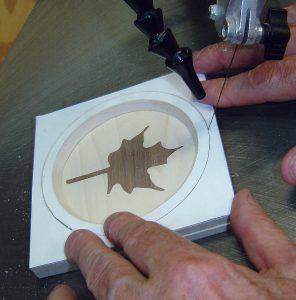
Cut and assemble the inlay design. Use a #68 bit to drill a blade-entry hole on the edge of the pattern. With the right side of the table tilted down to the correct angle (see sidebar), cut counter-clockwise around the pattern with a #2/0 blade. Glue the inlay into the coaster bottom. Sand the inlay smooth. |
 |
Cut the inside of the rim. Adhere a coaster pattern to the rim stock. Drill a 1/8″-diameter blade-entry hole where indicated on the pattern. Tilt the left side of the table down 30°, and cut counter-clockwise around the inside of the rim with a #5 reverse-tooth blade. Leave the table tilted down 30°. |
 |
Glue the rim onto the coaster bottom. Apply a thin layer of wood glue to the bottom of the rim. Center the rim around the leaf inlay and clamp it in place. Use an awl or flat-bladed screwdriver to remove any glue squeeze-out from inside the rim. Allow the glue to dry. |
 |
Cut the rim of the coaster. With the left side of the table tilted down 30°, cut counter-clockwise around the perimeter to produce a cone-shaped rim, or cut clockwise to produce a bowl-shaped rim. Sand and round the coaster. Apply several coats of interior/exterior spray varnish to protect the wood. |
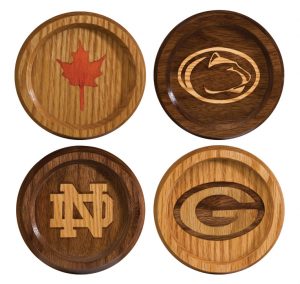 |
It’s easy to customize these coasters for your personal use. Embellish the coasters with the logo of your favorite sports team or add color to the design by staining or dyeing the inlay. |
Materials:
- Scrap wood: 2 each 1/4″ x 11/2″ x 11/2″ (test inlay)
- Poplar: 2 each 1/4″ x 41/2″ x 41/2″ (coaster rim and bottom)
- Walnut: 1/4″ x 41/2″ x 41/2″ (leaf inlay)
- Wood glue
- Spray adhesive, temporary bond
- Tape, double sided
- Packaging tape, clear (optional)
- Sandpaper, assorted grits
- Clear finish of choice (I use interior/exterior spray lacquer)
Tools:
- #5 and #2/0 reverse-tooth blades
- Drill with 1/8″-dia. and #68 (.031″) drill bits
- Belt sander (to flatten inlay)
- Pin (for pattern placement)
- Clamps: 8 each 2″ spring or equivalent
- Screwdriver: toothpick, awl, or flat-blade (to clean up glue squeeze out)
CLICK HERE to download the Leaf Inlay Patterns.
CLICK HERE to download the Coaster Pattern.
 |
Gary MacKay of Myrtle Beach, SC, is the author of Box Making Projects for the Scroll Saw, available from Fox Chapel Publishing, www.FoxChapelPublishing.com. |
This article originally appeared in Scroll Saw Woodworking & Crafts Fall 2008 (Issue 32).