 Quick and easy project makes an ideal gift
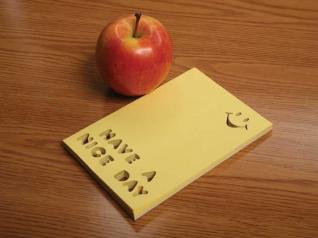
Paper isn’t really any harder to cut than wood, and these custom note pads are as fun to cut as they are to use. You can quickly turn an inexpensive tablet into a unique item. They make a perfect end of year gift for a teacher or add your own initials for personalized stationery.
Step 1: Stack the tablets to be cut. Make certain they face the same direction and the same sides face up. The thickness of the note pads and type of paper dictate just how many pads can be cut at once.
Step 2: Place one piece of cardboard or plywood the same size as the note pad on the top and the bottom of the stack. Be sure to mark which is the front of the stack and top of the tablet to avoid cutting the pattern in the wrong location.
Step 3: Squeeze the stack tightly together, and wrap the entire stack with masking tape. Make certain the tape is flat across the bottom, and always start and stop the tape on the top of the stack. Complete several passes in each direction (lengthwise and across the width), going around the stack completely.
Step 4: Size your pattern to fit your tablet of choice. This pattern is sized to fit a 4″ x 6″ pad. With the use of a copy machine, the pattern can be made to fit just about any size note pad or tablet. Glue the pattern to the top piece of cardboard to keep it from coming loose when cutting.
Step 5: After the pattern is glued on, drill 1/16″ blade-entry holes. Begin cutting out the letters. I generally use a #2/0 reverse- tooth blade to do the cutting. Cutting paper (plus the cardboard, masking tape and glue) is hard on the blade. When the blade gets dull, you’ll smell the paper burning. When finished, slice the masking tape with a knife and peel off the cardboard.
Step 6: Fan the note pads and blow on them while fanning. The paper dust gets a little thick inside the pages sometimes. You’ll want to blow it out before giving the note pads as gifts.
Materials
|
Tools
|
Tip
When placing the cardboard piece on the top of the stack, mark it with an arrow pointing to the top edge of the notepad. The arrow shows how to place the pattern on the stack to assure proper cutting. It is frustrating to cut out the design, take the stack apart and discover that the project was cut upside down or backward.
Attachments
“Have a Nice Day” Note Pad Pattern