Gravity helps this toy race to the finish line
By Paul Fellay
Cut by Rolf Beuttenmuller
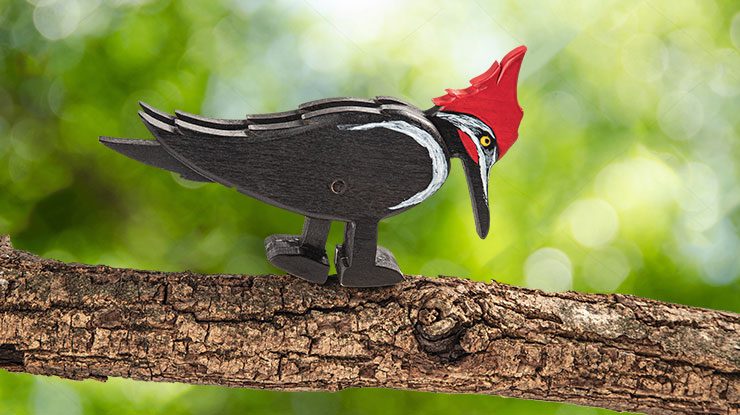
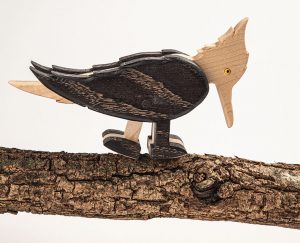
In addition to their striking features, woodpeckers are notorious for, well, pecking wood. They use their long beaks to peck, drill, and drum wood for hours, relying on their strong tail feathers to support them as they cling to a tree trunk or branch. They also have two back toes to lean on! My woodpecker ramp walker does not have helpful toes, but it does have movable legs that will get it from point A to point B. All this dynamic toy needs is gravity to get moving.
Getting StartedPre-sand the blanks, moving progressively through the grits until you reach 320. Remove dust with a tack cloth. Stack the two outer layers, securing them with clear packaging tape. Apply removable shelf paper to the surface of each blank and attach the patterns. Drill two holes for the eyes, as marked on the pattern, with a 1/8″ (3mm)-dia. bit. Note: You could woodburn the eyes or just paint them on, if desired. |
Cutting and AssemblingCut the pieces. Then drill the 1/4″ (6mm)-dia. dowel holes while the outer pieces are stacked. Use an awl to mark the center of the swinging leg piece. Remove the patterns and sand each piece with an orbital sander, lightly softening the sharp edges on all sides except the ones that will be glued; these should stay flat. Take extra care to smooth the swinging leg piece, as it should be able to move without friction. Drill a 17/64″ (7mm)-dia. hole through the awl mark on the swinging leg piece. Stack the three body pieces, making sure the edges are flush. Glue and clamp one side onto the central body piece, keeping glue out of the area where the swinging leg will go. Once the glue is cured, dry-fit the rest of pieces together with clamps. You can dry-fit a dowel into the hole to help with alignment. By clamping the two sides during the dry fit, you simulate the conditions of the actual glue-up, and can easily sand the swinging leg further if it binds when pressure is applied. The legs will form a slight curvature when side-by-side to allow for rocking. Note: If the legs do not sit at the same level, the bird will not walk properly. Refer to the exploded drawing below. |
| When you are satisfied with the fit, glue the dowel to one side, leaving the back leg unglued and free to swing. Then glue and clamp the second body side in place, applying glue to this side of the dowel, as well. Cut off the excess dowel and sand both sides smooth on a belt sander. Soften all body edges further with the orbital sander, and then hand-sand the edges, moving up progressively through the grits to 320. Remove dust with a tack cloth. | 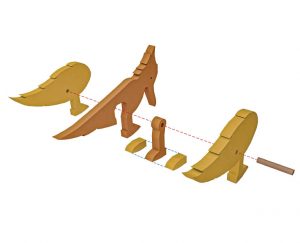
Woodpecker Ramp Walker Assembly Drawing |
Creating An EyeFor a more dimensional eye, round the end of a dowel with 320-grit sandpaper. Cut it to size, about ½” (1.3cm) long, and stick it into the eye hole, rounded side out. Seal the eye with sanding sealer, and then paint it your desired color. Once dry, add a dot of black for a pupil. |
FinishingApply a finish. If you chose a material without a pronounced or decorative grain, such as MDF or pine, get creative with different colors; you could paint on thinned acrylics, and then apply a clear lacquer once the paints have dried. If you chose rich hardwoods, a natural finish (such as clear satin lacquer) is best. Alternately, you could leave the toy unfinished and let a child’s imagination do the rest, encouraging them to experiment with watercolors, glitter, felt pens, or crayons. |
For a different look, use stained hardwoods. |
Test RunTo test the project, you will need a ramp. I used a wide wood plank, propped up on one end. Position the walker at the top of the slope and give it a tap to get it to rock. Adjust the angle as needed; if it’s too shallow, the walker won’t move, but if it’s too steep, the toy will fall on its beak. |
| Materials
• Wood, such as maple, 1/2″ (1.3cm) thick: body, 8″ (20.3cm) square • Wood, such as red oak or maple, 1/2″ (1.3cm) thick: sides, 6″ (15.2cm) square • Wood dowel, 1/4″ (6mm)-dia.: 4″ (10.2cm) long • Wood dowel, 1/8″ (3mm)-dia.: eyes, 2 each 1/2″ (1.3cm) long • Self-adhesive shelf liner, such as Duck® Brand EasyLiner® • Tape: clear packaging • Sandpaper: assorted grits to 320 • Wood glue • Tack cloth • Finish, such as clear satin lacquer • Acrylic paints or dyes (optional) |
Tools
• Scroll saw with blades: #3 or #5 reverse-tooth • Drill press with bits: 1/4″ (6mm), 17/64″ (7mm), 1/8″ (3mm)-dia. • Variable-temperature woodburner with nib: writing (optional) • Sanders: belt, orbital • Clamps • Wide wood plank (optional) • Awl |
| About the Author |
|
Paul Fellay is an Argentinean woodworker who has been building and designing wooden dynamic toys for the past four years. With the help of Paul Roy from Ontario, Canada, he works tirelessly to perfect each ramp walker design. Find more of Paul Fellay’s work on Etsy at RampToyPlans, on Sellfy at Ramp Walker Toys, or facebook.com/ramptoys. |
| About the Test Cutter |
|
Rolf Beuttenmuller started scrolling in 2004 after his wife, June, bought him a scroll saw for his birthday. He joined a local club and enjoys new and challenging projects. His motto is, “I don’t know that I can’t, therefore I can.” Rolf retired from Brookhaven National Lab after 34 years of designing and building special devices for high energy and photon science research. He lives in Bellport, N.Y. |
 |
Purchase our spring issue!
Purchase Our Spring Issue Here!
For more articles like these, subscribe to Scroll Saw Woodworking & Crafts magazine. SubscribePlus! Get mini magazines in your e-mail between printed issues with Short Cuts, our e-mail newsletter. |