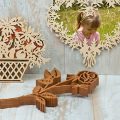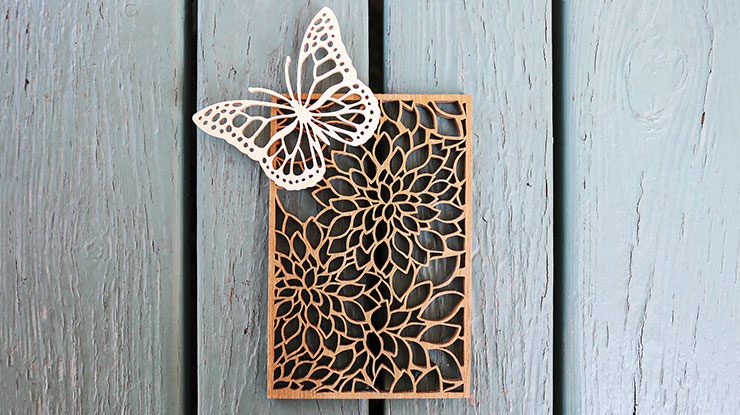
Adorn a postcard-sized piece with an elegant butterfly overlay
By Charles Hand
My wife and I are avid gardeners, and we both enjoy tending to the many varieties of plants and flowers on our small property. When designing this arrangement, I was inspired by the beautiful butterflies and other pollinators that visit our garden each day. This is a perfect project for those small scrap pieces of wood that you may have lying around the shop.
Prepping and CuttingCut all the blanks to size, as indicated in Materials & Tools on page X. Sand the front and back of the blanks thoroughly. Blow off the dust, or remove it with a tack cloth. Attach removable EasyLiner® laminate shelf liner to the top of the rectangular and butterfly blanks, and then apply spray adhesive to the backs of the patterns. Let the adhesive set for one to two minutes, and then press the patterns down onto the paper, eliminating any air bubbles. If you choose to stack cut, apply FrogTape® or blue painter’s tape around the perimeter of the stacks, holding the wood flat and secure. Drill the blade-entry holes and cut the frets. Cut the perimeters, remove the tape, and peel off the shelf liner. |
FinishingSand the surface and sides of each piece carefully, using needle files to clean up tight areas. Remove the sander dust with compressed air. Apply Danish oil or mineral oil to the floral piece with a paintbrush, making sure to get into all the crevices. Note: For outdoor use, I recommend exterior-grade clear varnish (brush-on or spray). Apply a second coat, wipe it off with a rag, and then let dry. Seal the butterfly with a clear brush-on varnish. Once dry, glue the butterfly onto the floral and display. |
|
Materials • Wood, such as cherry or poplar, 1/4″ (6mm) thick: • Wood, such as Baltic birch plywood, 1/8″ (3mm) thick: butterfly, approx. 3 1/2″ x 4″ (8.9cm x 10.2cm) • Sandpaper: 180-220 grit • Tack cloth • Soft cloth (for finish) • Tape: Frog® or blue painter’s (if stack cutting) • Spray-adhesive, such as Elmer’s or 3M Super 77 • Self-adhesive shelf liner, such as Duck brand EasyLiner® removable covering • Finish, such as Danish oil or mineral oil • Varnish, such as exterior-grade clear: brush-on • Wood glue
|
Tools • Scroll saw with blades: #2 or #3 reverse tooth • Drill press or hand drill with bits: 3/64″ (1mm)-dia. or #56 wire size, 1/16″ (2mm)-dia. or #53 wire size • Palm sander (optional) • Needle files (optional) • Air compressor (optional) • Paintbrush: small |
| About the Author |
|
Charles Hand is retired from a career in electrical/mechanical design, graphic arts, and senior project management. He enjoys intarsia, fretwork, segmentation, inlay, and just about everything there is to cut with a scroll saw. Charles has won best of show and several other awards for his work and designs at local craft and woodworking shows. For more information and a tutorial on Charles’ pattern application method and framing techniques, or for more of his patterns, visit scrollsawart4u.weebly.com. |
 |
Purchase our summer issue!
Purchase Our Summer Issue Here!
For more articles like these, subscribe to Scroll Saw Woodworking & Crafts magazine. SubscribePlus! Get mini magazines in your e-mail between printed issues with Short Cuts, our e-mail newsletter. |