Learn to pack a table saw, band saw, 200+ tools, and 102 sq. ft. of shelves into an 8×6 shop space
By Stephen Watson
At first, utilizing a space smaller than the average bed of a CNC table seemed a far-fetched notion. However, when I turned that problem into a challenge, converting the ruined and roofless outbuilding in my tiny garden into a workshop seemed achievable. Originally, I’d just wanted a space that would allow me to tinker with wood, but once I started, the project grew legs. Now, four years later—after leaning heavily on ideas taken from the tiny house movement—I’ve turned this “tiny workshop” notion into a working concept. (It also functions as the film set for my popular YouTube channel.)
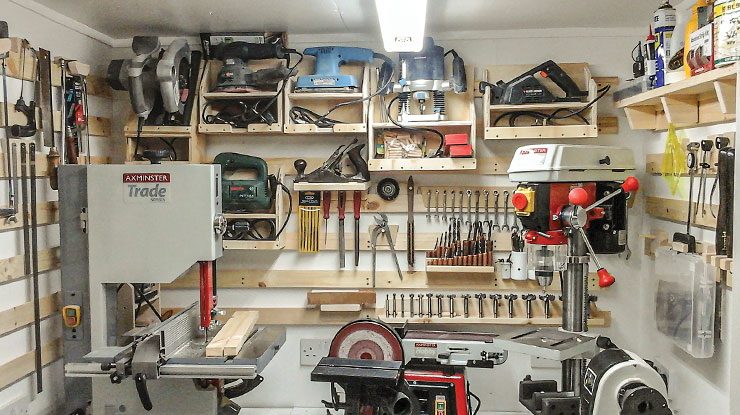
Some people scoff at the size—my workshop really does measure 8×6—but when they see what can be achieved there, ridicule turns to amazement. Through ingenious organization, top-notch storage, and custom-built facilities, it is indeed a fully fitted workshop comprising a bench, table saw, band saw, scroll saw, drill press, sanding station, lunch box planer, lathe, compressor, a wealth of power tools, and a custom dust extraction system. Some of the tips, techniques, and hacks I picked up along the way have proven useful to others blessed with larger workshops, so I welcome the opportunity to share some of them here.
Making a Game Plan

Space really is the final frontier—and no matter how big your workshop is, it never seems big enough. Even though most of the familiar methods of workshop planning and layout go out the window when applied to such a small space, I still needed to take into account the operating area around each machine and the space the material requires when being worked on. As I operate only one piece of equipment at a time, it made sense to overlap these workspaces when possible to squeeze in the machinery—a procedure that can optimize space in any size of workshop. The shaded areas in the illustration denote the operational space required for each machine. Overlapping these areas minimizes wasted space.
Although having the larger machines on casters does allow me to pull them to the center of the workshop to maximize their use, I still wanted to operate them in situ for the smaller tasks. A few hours spent with graph paper and sketches revealed a) which little-used machines would need to be stored under the bench to be brought out when required, b) how often and for which tasks the machines would need to be moved, and c) how much operating space I could reasonably overlap. This exercise indicated how best to organize my original layout and how compact it could be without compromising safety and efficiency. After an initial game of musical chairs during its design, my layout has changed little over the years.
The 8×6 Workshop contains:
• 187 hand tools • 21 power tools • 9 pieces of heavy machinery • 102 sq. ft. of shelving
and wall storage • Countless accessories
Internal Dimensions: • Width: 5′ 11″ • Length: 7′ 103/4″ • Height: 7′ 4″ • Footprint: 46.7 sq. ft.
• Volume : 342.6 cu. ft.
Being Ruthless
If it does not earn its keep, it has to go. The space an item takes up can sometimes be more valuable than the item itself. Clutter can creep up on me and I don’t realize until frustration sets in at not being able to work properly. If a tool is not getting used, I relegate it to the household toolbox or closet. If I cannot imagine using it in the foreseeable future, it has to go—usually swapped or given to a fellow woodworker, so I can always borrow it, if necessary.
Offcuts and scraps are carefully scrutinized for possible future use, as my storage space is small. I am lucky to reside less than half a mile from a major lumberyard, so I can acquire most materials with ease. Carefully calculated quantities help keep purchasing costs and storage space low, although I have sometimes gotten away with ‘temporarily’ storing hardwood behind the living room sofa!
Staying Clean and Tidy
My workshop is a place where hassles and pressures are left outside and I can truly switch off and enjoy the hobby. It is so easy to drop into the ‘I’ll clean up tomorrow’ mode of thinking, but after a week or so, this mentality becomes destructive. I soon got into the habit of the ‘after session’ tidy-up, and this chore became a pleasure once I realized how much time it could save me. I do not enjoy trying to find the 1/8″ (3mm) drill bit I just dropped onto the floor in a pile of shavings, for the second time! Every few weeks, I take the time to clean up thoroughly while listening to a few episodes of my favorite podcast (about woodworking, of course). It truly is time well spent. In the spring, the entire workshop gets a deep clean, setting me up for the warmer weather and the start of filming for my YouTube adventures.

Flexibility
Having a designated place for everything is a great advantage in a small space. Everything apart from the bench that the drill press sits on is either on castors or hung on the walls using a French cleat system. Custom hangers for each tool mean that not an inch is wasted. There are no cupboards or drawers to collect junk and, as the cleats cover all of the wall space, the entire workshop can be rearranged at will. Even the roof space is used for storage. Two DIY roof-mounted gantries accommodate homemade camera and microphone booms, and with metal plates and power sockets for lighting up there too, I have the ability to move my magnetic work lights wherever they are needed. Tripping over tripods during filming is something I don’t miss at all.
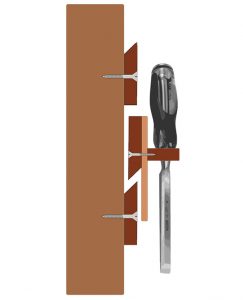
The French Cleat Method
The French cleat is a method of hanging anything—from a piece of artwork to fully laden kitchen cabinets—with ease. Just use a 45° angle on the mating surfaces, and the weight of the hanging object holds it securely against the wall. French cleats provide an added feature of total flexibility, meaning that the hanging items can easily be repositioned elsewhere on another cleat. The cleats themselves only intrude into the workspace by the thickness of the wood used (in my case 7/8″ [2.2cm] pine) and therefore stay out of the way when not in use. The workshop cleats cover three walls, so anything can be relocated depending on my changing needs.
When gathering materials for a French cleat system, keep in mind that pine, hardwood, or plywood from 3/4″ (1.9cm) up is fine for the rails and hangers. However, I would avoid composite boards such as MDF or particle board, as these can give out without warning. Use multiple anchor points for each length into either brick wall or wooden studs. Once you have the first cleat in place and level at the lowest point on the wall fitting, the rest is easy. With the use of temporary spacers, the remaining rails can be equally spaced with accuracy as you work upward. Rows of cleats close together will maximize the usable space, but remember to allow a little extra clearance between cleat rails for the hanging cleat to drop into place. Spacing them evenly will allow you to use more than one cleat for large or heavy items without compromising mobility. My cleat rails are 2 1/2″ (6.4cm) and spaced 3 1/4″ (8.3cm) apart, but larger workshops may not necessarily require such a density.
Organization
When reaching for a tool, I want to be able to grab it without having to move other things out of the way first. It slows down workflow and leads to untidy clutter, as items not related to the task are often moved and not immediately put back where they belong. Disorganization soon escalates into an untidy, frustrating, and inefficient mess.
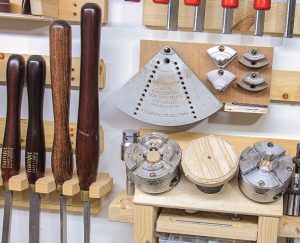
As floorspace is a premium, I hang everything on the walls and put it back immediately after use. Tools are organized around the area they are used the most, with the least-used tools hung out of the way. For example, all the wood turning tools, chucks, abrasives, and finishes are located within easy reach of the lathe. Planes, saws, gauges, and other hand tools sit near the workbench. Drill bits, Forstner bits, chuck keys, and lubrication oil are placed around the drill press. You always know where every item is, and once you are familiar with the layout, you can reach for a tool without moving and know exactly where it is without even looking!
Should I use a tool in more than one place, it gets placed in a spot where I can reach for it from either position. The pockets of my working trousers always contain pencils and a tape measure, so I know where they are at all times. This may appear to be a little over-the-top, but consider all those wasted minutes spent looking for a tool. They can soon add up!
Hangers and Caddies
When it comes to storage strategies, your imagination is your only limiting factor. My design rule is that the tool must be accessible and reachable with just one hand. Hangers and caddies are utility items, designed to do a job and not necessarily for show—so anything goes. For an individual tool hanger, I customize the method of hanging depending on the shape of the tool. When a tool already has a method of hanging, I take advantage of it. Drawing the shape of the hand hole and cutting it out of the appropriate wood using a scroll saw couldn’t be easier to get saws hanging just right—teeth hanging inward, of course!
Caddies are built to suit the tool and its accessories. Most are variations of a box section that is simply screwed together so that it can be easily disassembled, modified, or reused to accommodate new accessories. I find 1/2″ (1.3cm) plywood to be quite adequate for these caddies. I would imagine that, like me, you may have a few offcuts of the stuff already!
A Few Other Things to Keep in Mind:
| • Areas can have more than one use. Turning the lathe bed into an additional workspace with a clip-on panel when it’s not in use can be handy for larger projects. | 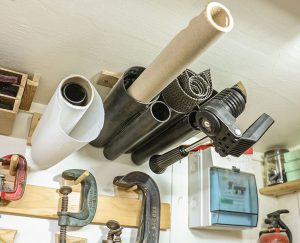 |
|
• The floor is not for storage. Pushing something out of the way under a bench will restrict that bench from being moved, but mounting additional storage between the casters will allow the space to be utilized and will move with the bench. |
|

Thinking Outside the Box
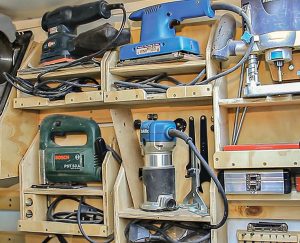
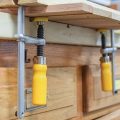
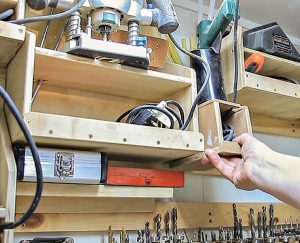
In the 8×6, power tools are stored in custom lift-down caddies so all their essential accessories are kept with them. The caddies, which also store the power flex, are simple to make, and you can easily modify them on the fly should the need arise. If I have to work outside or off-site, I can easily grab the caddy and go—knowing I have all the bits and pieces required for that tool. These caddies are more accessible and space-efficient than the original storage cases. In normal circumstances, when a power tool is in use, its case lies around, usually left open to collect shavings (come on, admit it). But in my shop, the caddy goes back on the wall and out of the way.
To keep batteries from rolling around or getting lost, I situate them near the tools they are used with and rechargeable cells are placed backward as a visual reminder that they are in need of an overnight recharge. This simple hack saves a small fortune from going into the swear box!
Saws would take up a great deal more space if conventionally stored flat to the wall; however, hanging them sideways saves valuable wall space. Some PVC pipe and hot glue allow compact storage for pliers, grips, and other hand tools.
More on PVC and Hot Glue
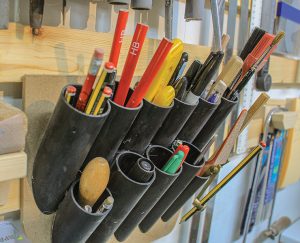
When building tool storage areas, I often use up offcuts of PVC or ABS pipe, as it’s a ready-made resource. I either buy it cheap, dumpster-dive (always seek permission first), or ask local tradespeople for offcuts. Overflow pipe around 3/4″ (1.9cm) works great for collecting small tools, and rainwater downpipe works well for larger individual tools.
My glue gun caddy accommodates both the glue sticks and the power cable, and the short length of 3″ (7.6cm) PVC downpipe holds the gun so that it can be safely stowed straight after use while still hot! The pipes are hot glued together and to the cleat hanger, which offers enough strength for the job but lets me pull them apart for rearrangement at a later date. If I find I need another holder, I simply cut a piece of pipe to the required length and, after a test fit with the tool, glue it onto the existing arrangement.
A Final Thought
Being in the workshop—a creative space I have full control of—lifts the spirits. In my life, particularly in my later years, I’ve had my fair share of loss and tragedy, and on more occasions than I care to count I still have depression pay me a visit. Whenever I start catching glimpses of the black dog out of the corner of my eye, I know I would benefit from some time in the workshop. The 8×6 is a space where no black dog of depression is allowed, and as I enter, I mentally tell him he has to stay outside for his own safety. When I close up for the day and walk the handful of yards back to the house, he is nowhere in sight.
Here is a gallery of some of Stephen Watson’s work.
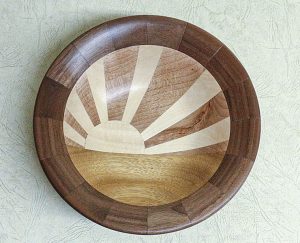
Sunrise Bowl.

Geodesic Sphere.
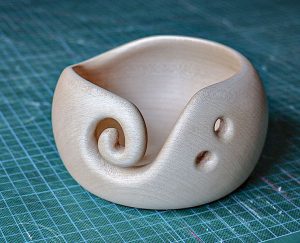
Yarn Bowl.

Wizard Wand.
Have you used any clever space-saving tricks in your own workshop? Send us photos of your converted garage, basement, garden shed, etc. at editors@scrollsawer.com!
About the Author
Stephen Watson, Cert.Ed., lives in the town of Leyland in Lancashire, UK. He is a three-dimensional artist who works in wood, plastics, and paper. His work has been exhibited throughout the UK and has been acquired by collectors worldwide. Stephen realized his dream of a home workshop in 2016. His hobbies include amateur radio, electronics, filmmaking, and origami; he is known to his friends as ‘Nerd.’ You can find Stephen at 8x6workshop.co.uk or on YouTube at Stephen’s 8×6 Workshop.
 |
Purchase our spring issue!
Purchase Our Spring Issue Here!
For more articles like these, subscribe to Scroll Saw Woodworking & Crafts magazine. SubscribePlus! Get mini magazines in your e-mail between printed issues with Short Cuts, our e-mail newsletter. |