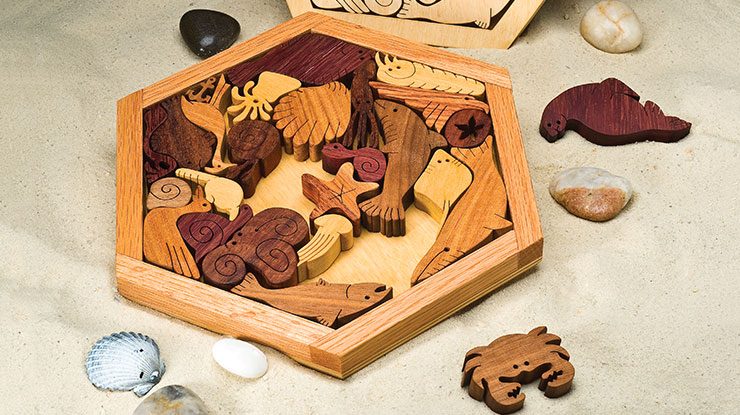
Easy-to-cut design is a challenging tray puzzle
By Ruth Chopp
I live in Gig Harbor, Wash., and grew up playing on the beaches of Puget Sound and camping in the forest parks. That probably explains my passion for woodworking and sea life, which come together in this fun puzzle. The project is easy to cut, but the design can be challenging to reassemble.
You can make this puzzle out of birch plywood and paint or stain the pieces. The puzzle I entered in the Best Project Design Contest was made using five or six different hardwoods with contrasting colors, which is a good way to use small pieces of scrap wood.
Download the PatternCutting the Pieces
Step 1: Prepare the pattern. Lightly sand 1/2″ (1.3cm)-thick Baltic birch plywood. Use spray adhesive to attach a copy of the pattern to the blank. Alternatively, cut the pattern into individual puzzle pieces and attach the patterns to scraps of hardwood. Plan the wood selection so adjacent pieces are cut from contrasting colors of wood.
Step 2: Drill the holes. When the glue is dry, drill the eye holes and blade-entry holes for the small inside cuts. Use a wood backing to avoid tear out when drilling. Use a #52 wire bit for the following holes: starfish center, snail eye, kelp hole, anchor hole, heron eye, octopus inside cut, sea cookie inside cut. Use a #42 wire bit for the whale eye. Use a #44 wire bit for all of the other creatures‘ eyes.
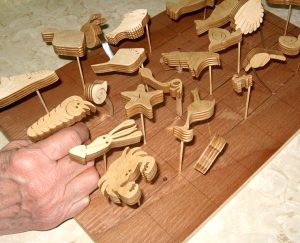 Step 3: Cut the puzzle pieces. Remember to change blades frequently when cutting the pieces—I cut about seven pieces per blade. Peel off the patterns, wipe the pieces with mineral spirits to remove the adhesive, and let them dry. Lightly sand all of the pieces with 180-grit sandpaper.
Making the Tray
Step 4: Make the tray. Finish cutting along the dashed lines to create the frame. If you cut hardwood pieces, attach a copy of the pattern to 1/2″ (1.3cm)-thick stock and cut along the dashed lines. Trace the outside of the cut frame onto 1/4″ (6mm)-thick Baltic birch plywood and cut along the traced line to form the tray bottom. Lightly sand the frame and bottom pieces with 180-grit sandpaper. Glue the frame to the bottom, clamping each length of the side. When the glue is dry, remove the clamps and sand the perimeter.
Step 5: Finish the puzzle. Drill toothpick-sized holes in a piece of scrap plywood. Dip each puzzle piece in finish, wipe it with a lint-free rag, and place a toothpick in the eye hole. Insert the toothpick in a hole in the scrap plywood and allow the pieces to dry. Use a foam brush to apply finish to the puzzle tray and let it dry.
Alternate tray style
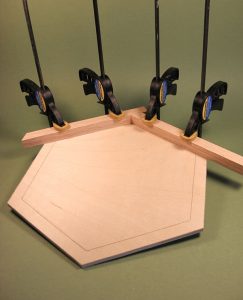
Alternate Tray Style
To make the tray bottom, trace the dashed lines from the pattern onto 1/4″ x 10″ x 10″ (6mm x 25.4cm x 25.4cm) Baltic birch plywood and cut along the perimeter only. Using 1/2″ (1.3cm)-thick hardwood and a table saw, cut six strips, each 1/2″ (1.3cm) wide by 6″ (15.2cm) long. Cut one end of each strip at a 60° angle.
Clamp (do not glue) the first strip to the tray bottom, aligning the strip with the inside traced line so it overlaps the edges of the tray bottom. Position the angled cut on the second strip against the first strip and align the strip with the traced guidelines. Apply glue to the second strip and clamp it in place until the glue dries. Align and glue the remaining strips one at a time, drying in between, until all are glued. Unclamp and remove the first strip, apply glue, and clamp it until dry.
After the glue is dry on the last strip, use a band saw or scroll saw to cut off the overhanging strips. Sand the perimeter and joints.
Download the PatternMaterials:
• 1/2″ x 10″ x 10″ (1.3cm x 25.4cm x 25.4cm) Baltic birch plywood (puzzle pieces and frame)
• 1/4″ x 10″ x 10″ (6mm x 25.4cm x 25.4cm) Baltic birch plywood (tray bottom)
• Assorted hardwood scraps (optional)
• Temporary-bond spray adhesive
• Mineral spirits
• Lint-free rags
• Minwax wood finish in natural
• Sandpaper, 180-grit
• Toothpicks
• Scrap plywood (backing board, drying board)
Tools:
• Wire drill bits: #52, #42, and #44 (1/16″, 3/32″, and 5/64″ standard bits)
• #5 reverse tooth blades
• Foam brush
About the Author
Ruth Chopp began her career as a home economics teacher. When her children left home, she decided to try woodworking, noting that using a scroll saw and a sewing machine are really quite similar. Ruth loves wooden Christmas tree ornaments, so she designed her own; she now has about 300 patterns. Contact Ruth via e-mail at melchopp@harbornet.com.
 |
Buy the Magazine
• For more articles like this, subscribe to Scroll Saw Woodworking & Crafts magazine. More Info• Plus! Get digital mini magazines in your e-mail between printed issues. Subscribe to our free e-newsletter, Short Cuts!
|