Simple guidelines for matching the blade to the pattern and wood
by Bob Duncan
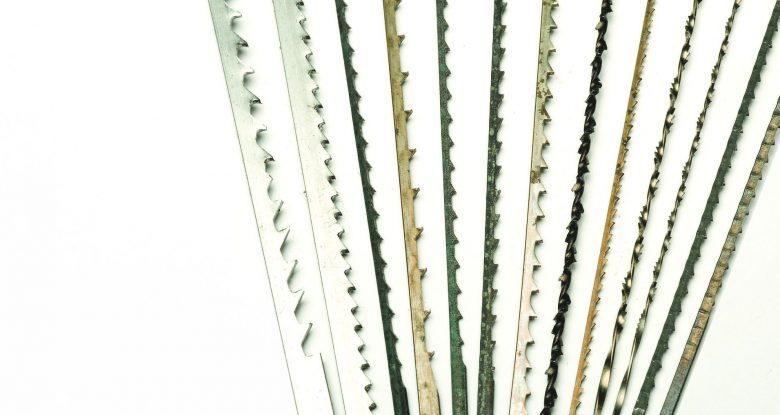
You can feel your blood pressure rising as the blades keep snapping while you cut. It’s equally frustrating when you try to make tight turns in a small fret, but the blade won’t turn fast enough. You know proper blade choice is the solution, but blades come in many sizes, shapes, and tooth configurations; how do you pick the right one?
Conventional wisdom has always suggested trial and error. And everyone is willing to share his or her favorite blade or favorite manufacturer. Instead of relying on guessing or gossip, use these general guidelines to help you to successfully select a blade without trying dozens of sizes, brands, and configurations.
To start, there are two main types of blades: plain-end and pin-end. Most saws, except a few entry-level models, use plain-end blades. Pin-end blades don’t come in small sizes and the 3/16″ (5mm)-diameter blade-entry hole they require is often larger than the frets you want to cut.
It’s best to buy blades from local or online scroll saw suppliers-; there are too many to list here, but you’ll find them in every issue of the magazine. Scroll saw suppliers stock a wider variety of blades than standard hardware stores do, and blades that cost $.41 at the hardware store are only $.20 from a scroll saw supplier. I buy blades by the gross (12 dozen) because I like having enough to last awhile. After all, your work stops when you run out of blades.
Blade Size
Some manufacturers list the width and thickness of the blade, but most use the semi-standard number system.
- Use larger blades (higher numbers) as the thickness or the density (hardness) of the wood increases. My rule of thumb is to use a #5 or #7 blade for 3/4″ (19mm) to 1″ (25mm)-thick medium-hard wood (such as cherry, walnut, or maple). Many scrollers, including test cutter Rolf Beuttenmuller, use the smallest blade they can. With my cutting style, I usually use the largest blade possible, but seldom larger than a #9.
- Larger blades (#9 and up) are more durable. They are also less likely to break as you apply pressure, and they cut faster. Large blades are mandatory for especially thick or hard wood. I once cut a puzzle from 1″ (25mm)-thick hickory using #12 blades. I still broke a lot of blades, but fewer than if I had used a smaller blade.
When considering large blades, it can be difficult to choose between a #9 and a #12 blade. Not every tooth configuration comes in a #12, so that may help you decide. I usually don’t go to a #12 unless I’m cutting wood that is either as thick as my saw can handle or extremely hard (such as hickory). - Use smaller blades (#3 and smaller) for thin wood. These blades cut more slowly, which gives you additional control when cutting thin wood. While I seldom cut unstacked 1/8″ (3mm)-thick wood, if I do, I use a #2/0 blade. That is the smallest size I use for wood. Puzzle cutters sometimes use smaller blades to make their tight turns, but for general scrolling, a #2/0 blade is small enough. Choose the blade that will allow you to cut the smallest frets without breaking every few cuts.
- If you are stack cutting, choose a blade based on the thickness of the stack. If you cut eight 1/8″ (3mm)-thick blanks at once (giving you an effective thickness of 1″ or 25mm), use a #5 or #7 blade. If you’re cutting four 1/8″ (3mm)-thick blanks, use a #2 or #3 blade.
- Consider the intricacy of the cuts. Larger blades will not cut tight corners or fit into small frets. When cutting intricate projects, choose the smallest blade that will cut the thickness of wood. Awhile back I was cutting an intricate project featuring delicate trees in 3/4″ (19mm)-thick poplar, and at the time, I only had #5 and #2/0 blades. The #5 blades were too large to cut the trees, so I used the #2/0. They were more suited to the intricate cuts, but actually too small—I broke most of my blades before I finished cutting the project. A #1 or #3 blade would have been my top choice in this situation.
Tooth Configuration
Not only do blades come in different sizes, but the cutting teeth come in different configurations. Some manufacturers indicate this as the teeth per inch (TPI), while other manufacturers use more specific terms. The TPI method can be a bit deceiving because it also depends on the width and thickness of the blade. A #2/0 regular-tooth blade would have more TPI than a #2/0 skip-tooth blade (see above), but a #1 regular-tooth blade may have a similar number of teeth to the #2/0 skip-tooth blade.
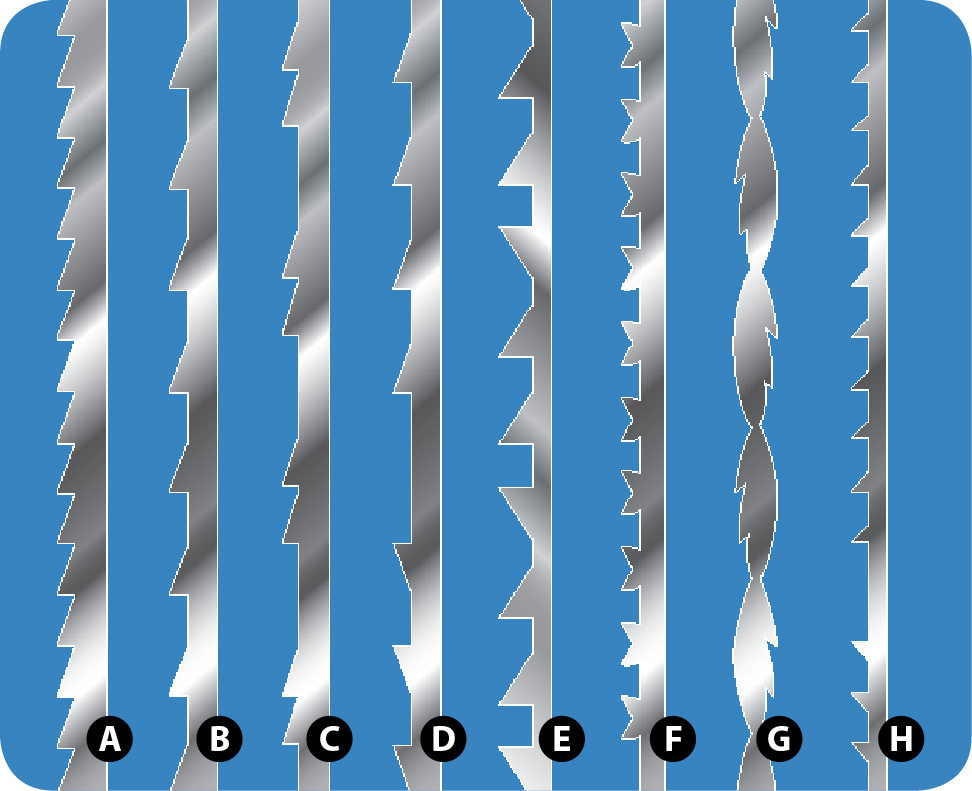
A. Regular-tooth blades have teeth evenly spaced along the blade. Where one tooth stops, another tooth starts. This was once the most common tooth configuration, but manufacturers have created several variations that work better when cutting wood.
B. Skip-tooth blades are the most common configuration. Instead of having one tooth right next to the last, they skip one tooth, leaving an open space between the teeth. The space helps clear sawdust and helps the blade cut faster. But, skip-tooth blades produce a slightly rougher cut surface than do regular-tooth blades.
C. Double-tooth blades are similar to skip-tooth blades in that there are spaces between the teeth—two teeth are back to back, and then one tooth is skipped. This produces a slightly smoother cut than the skip tooth, but it doesn’t cut quite as fast.
D. Reverse-tooth blades usually follow the skip-tooth or double-tooth configuration, but with the bottom couple of teeth pointed in the opposite direction from the rest. These teeth cut as the saw blade travels upward. Where the skip-tooth, double-tooth, and regular-tooth blades splinter the bottom of the blank slightly, reverse-tooth blades remove these splinters. Reverse-tooth blades produce a cleaner bottom cut than other blades, but they don’t clear as much sawdust. The sawdust can slow the cutting and possibly heat the blade, making it more likely to break or scorch the wood.
E. Two-way cut blades are similar to reverse-tooth blades—for every two teeth that point downward, one tooth points upward. This slows cutting even more, but produces a much smoother cut.
F. Crown-tooth blades have one tooth pointing up connected to each tooth pointing down, giving the teeth a crown-like shape. The blade cuts on both the upstroke and the downstroke of the saw. This configuration produces a smooth cut but is the slowest of all.
G. Spiral blades are essentially flat blades twisted into a spiral. Flat blades cut only from the front, but spiral blades cut in every direction—from the front, back, and side to side. This ability is useful for projects that are too long to spin on the saw table without hitting the back of the the saw arm. It is difficult to cut straight lines with these blades. I use them to cut fretwork portraits, which have few straight lines. Using a spiral blade takes practice; they can be difficult to control because they cut everything they touch. The kerf (saw cut) of a spiral blade is wider than the kerf of the same size of flat blade. Spiral blades come in skip-tooth and reverse-tooth configurations.
H. Premium blades are sometimes made of different types of steel and have different tooth shapes to cut hard, dense wood quickly (see Sidebar, page 72).
Using Blades
No matter what blade you are using, these simple tips will help you get the best performance from it.
- Determine which end is the top. If you’re using a crown-tooth blade, it isn’t important because these blades cut in either direction. For all other blades, the majority of the teeth should point down. Determine the tooth direction by running your thumbnail along the middle of the blade. It catches more in the direction the teeth are pointing, and it feels rougher if you run your finger in that direction, almost like coarse sandpaper. Once I determine the blade direction on one blade, I use a dab of cheap red nail polish to mark the top ends of the other blades in that pack.
- Prevent blade slippage. Manufacturers coat blades in light oil to keep them from rusting during transit. The oil is one of the top reasons a blade slips. I keep a scrap of sandpaper near my saw and rub both ends of the blade with it before installing the blade in the saw. This removes the oil, as well as the nail polish I use to mark the top.
Blades also slip because, over time, the set screws that hold them in place are polished smooth by the action of the blade and stop gripping. A bit of sandpaper will also remove this polish and give the screws a better grip. - Install the blade. When installing a blade, I usually fasten the top clamp first, especially if I’m using a saw that allows me to top feed. The top arm on these saws (such as the Delta, DeWalt, Excalibur, and Hawk) moves up enough that you can lift the bottom of the blade above the work piece. This isn’t a big deal for most scrolling, but it’s much easier to feed a blade down through a hole when cutting fretwork than it is to feed it up from the bottom. Once the blade is installed in the top holder, feed it down through the hole in the saw table and clamp it at the bottom.
- Apply tension. Each saw has a different method to tension the blade, but what it comes down to is making the blade just the right tightness. Some scrollers pluck or tap the blade and listen for a high C note, but I’m tone deaf. I tighten the blade until it barely flexes from side to side. If the blade is too tight and you press too hard while sawing, the blade can break. But if the blade is too loose and catches in the wood as it flexes from side to side, it’s also likely to break. Remember, tight is good, but too tight is bad.
- Prevent friction. Blades also break because they heat up, lose their temper, and become fragile. Friction created during the cutting process heats blades, so lubricate the blade by applying a little beeswax to it or by covering the blanks with tape (the lubricant that keeps the tape from sticking to itself will also lubricate the blade).
Dull blades also cause friction. All cutting dulls the blade, but cutting dense wood accelerates the process. The easiest ways to tell that the blade is getting dull are that you need to push harder for the blade to cut or you notice that the saw is cutting more slowly. This is a gradual process, so you may not realize the blade is dull until it breaks. If you do notice slowing or difficulty pushing, replace the blade. It is normal to use several blades per project; large projects or those made from thick or dense wood will require even more blades.
A blade burning the wood is also a good indication that it is getting dull and should be replaced, unless you’re cutting a resinous wood, such as cherry, which will always burn if you don’t lubricate the blade with tape or wax.
Cutting Other Materials
Most scrollers cut wood, but you can cut a variety
of materials on a scroll saw, including acrylic plastic, solid-surface material such as Corian, and even thin metal. For the most part, these materials can be cut with ordinary blades.
- Acrylic plastic tends to melt back together if you don’t lubricate your blade with tape or beeswax, but you can use any blade to cut it.
- Solid-surface material is pretty dense, so I suggest using a premium blade. Use the largest you can for the project.
- Thin metal may scratch or be scratched during cutting. To protect the saw table as well as the surface of the metal, sandwich thin metal between scrap plywood.
- Glass can also be cut with a scroll saw. This requires special diamond-impregnated blades. You also need to set up a system to drip water onto the area where you’re cutting; if the glass gets too hot, it will shatter.
Specialty Blades
Premium blades have different tooth shapes that give them a more aggressive cut and help them cut through dense woods quickly; they may also be made from special materials. For example, Olson’s PGT (Precision Ground Tooth) blades are ground from high-carbon steel rather than milled from steel that is later hardened, like standard blades. All of the premium blades cut quickly, so I would not use them for thin or soft wood, but they make cutting thick, dense wood much less of a chore. Note, however, that they are slightly more expensive than standard blades. Other premium blades include Olson’s Mach Speed, Flying Dutchman’s Ultra Reverse and Polar, and Ben’s Scroll Saw’s Pégas Modified Geometry and Speed Cut Reverse.
Never Fail Blade Chart
Click here to download a PDF of the Never Fail Blade Chart.
 This article first appeared in Scroll Saw Woodworking & Crafts Spring 2013 (Issue 50).
Discuss this material on the Scroll Saw Woodworking & Crafts forums.