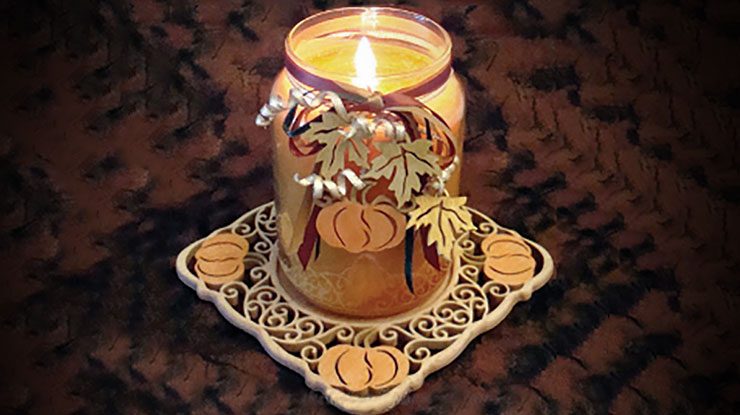
Turn any candle into a seasonal decoration with this tray set
By Sheila Landry
This pretty tray protects your table and adds to the festive atmosphere. The candle charms also look great hanging from a wreath, a doorknot, or packages.
I like to accent the hardwood tray with autumn colors.I used a product by DecoArt Americana called Staining and Antiquing Medium, which turns any acrylic paint into a stain that won’t lift the grain of the wood and is easy to apply without streaking. The stain is odor-free and dries as quickly as the acrylic paints, yet allows the grain of the wood to show through. It is available wherever DecoArt Americana paints are sold or can be purchased online at www.decoart.com.
As always, please use caution when burning candles. Follow the manufacturer’s instructions. Never leave burning candles unattended or where children and pets can upset them.
Cutting the Candle Tray
Sand the wood with 120-, 220-, and then 320-grit sandpaper (I use a random orbital sander). Remove the sanding dust. Cover the top of the board with clear packaging tape or blue painter’s tape. Attach the pattern to the tape with spray adhesive.
Draw a small test circle on a piece of scrap project wood. Drill a blade-entry hole along the circle with the smallest bit you can fit a #5 blade through. Tilt the left side of the saw table down (or tilt the saw head to the right) 3°. Cut clockwise around the circle. The circle should drop and catch. If the test circle slides down too far, increase the angle by 0.5°; if the test circle doesn’t go down far enough, reduce the angle by 0.5°. Cut test circles until you are satisfied with the results, and then cut the inner circle of the tray. Tape the circle back in place.
Return the saw table or head to vertical and cut the perimeter of the tray with a #5 blade. Drill blade-entry holes and make the inside cuts with a #2 reverse-tooth blade. Remove the patterns and use a router or laminate trimmer with a roundover bit to round the inner and outer edges of the frame.
Cut the charms with a #2 reverse-tooth blade.
Adding the Accent Colors and Finishing the Tray
Hand-sand the pieces and remove the dust. Thin orange acrylic paint with DecoArt Americana Staining and Antiquing Medium to create a gel stain. Paint the orange accents on the tray and charms. Repeat the process with green acrylic paint for the green accents. Allow the stain to dry thoroughly. Apply a light coat of acrylic spray sealer/finisher to the pieces. Do not apply sealer to the inner edges of the frame or the outer edge of the cut circle. When the finish is dry, apply a bead of glue to the bottom edge of the frame, carefully press the circle into place, and wipe off any excess glue.
Tie decorative ribbon around the neck of the jar, threading the charms through the ends. Glue rubber pads to the bottom of the tray for additional stability if desired.
Materials:
• Light-colored hardwood, such as maple, 1/2″ (1.3cm) thick: tray, 7″ (17.8cm) square
• Light-colored hardwood, such as maple, 1/8″ (3mm) thick: charms, 3″ x 5″ (7.6cm x 12.7cm)
• Sandpaper: 120, 220, 320 grits
• Spray adhesive: temporary bond
• Packaging tape: clear
• Acrylic paint, such as DecoArt Americana: antique green (DA147), canyon orange (DA238)
• DecoArt Americana Staining and Antiquing Medium (DS51)
• Acrylic spray sealer/finisher, such as DecoArt Americana: matte
• Epoxy: 2-part clear
• Ribbon
Tools:
• Scroll saw blades: #2 reverse-tooth, #5 reverse-tooth
• Drill press with bit: assorted small
• Router or laminate trimmer with bit: small roundover
• Paintbrush
• Handheld orbital sander (optional)
The author used these products for the project. Substitute your choice of brands, tools, and materials as desired.
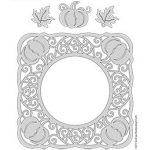
Patterns
 .
.
.
CLICK HERE to download the patterns.
.
.
.
About the Author
 Sheila Bergner-Landry grew up in the Chicago area and began her woodworking and painting career when her daughter Danielle was born, more than 20 years ago. A friend, Cari Denison, introduced her to scroll sawing. Sheila relocated to Nova Scotia, Canada, where she has found new inspiration for designs. For more of her patterns, call 902-482-7174 or visit www.sheilalandrydesigns.com.
For more fun scroll saw projects, subscribe to Scroll Saw Woodworking & Crafts magazine. CLICK HERE for more information.