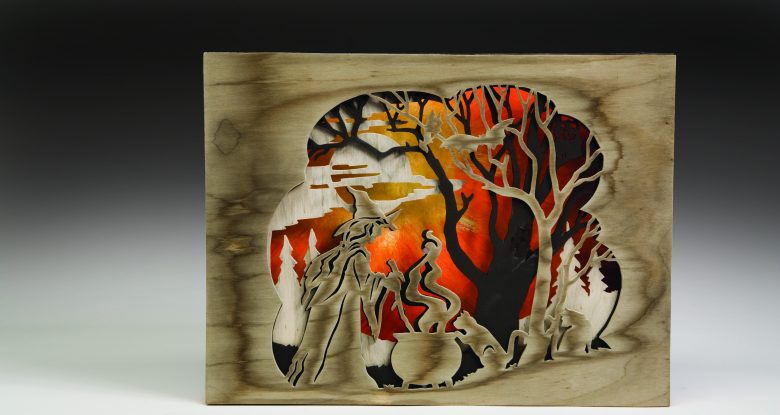
Multiple layers add depth and dimension to this spooky Halloween scene
by Lora S. Irish
Cut by David Penman
Even beginners can achieve striking results by breaking this project down into three layers. Experiment with different finishing techniques for a unique portrait.
Start by cutting the wood to size. Depending on the thickness of the wood you choose, you may be able to stack-cut several projects at once. Sand each blank before cutting and again afterward to remove any burrs.
|
Add Tannin to Your Project Traditional black tea is very high in tannin, which is needed to make the ebonizing stain work. If you cut the project out of a low-tannin wood, such as poplar or Baltic birch plywood, spread tea over the wood, allow it to dry most of the way, then add the ebonizing stain. —Gill Dexter of Bromsgrove, Worcestershire, UK |
Assembling the Layerscape
Step 1: Paint or stain the layers. It looks best if each layer is painted or stained a different color. I suggest a light stain for layer 3, a dark stain for layer 2, and a medium stain for layer 1. Try using different strengths of Mac Simmons’ ebonizing stain to darken the wood. I painted the backing board with red, orange, and yellow paint to highlight the design. After your finish dries, apply a clear topcoat.
Step 2: Attach the layers together. You can use wood glue in the solid areas between the layers or simply put all three cut pieces and the backing board into a frame. The frame fasteners should hold the layers together tightly. You could also insert spacers, such as small strips of plywood, between the layers to add extra dimension.
Materials:
- Plywood, 1/8″ (3mm) thick: 4 each 8″ x 10″ (20.3cm x 25.4cm)
Note: Leave one piece uncut to use as the backing board. - Spray adhesive, transfer paper, etc. (to transfer pattern to the blank)
- Clear topcoat
- Stain: light, medium, and dark or ebonizing (0ptional)
- Acrylic paint (optional)
Tools:
- Blades: #2/0, and #1 or #3
- Drill and assorted small bits
- Sandpaper
Patterns
About the Author
Lora lives in Maryland. Visit her digital pattern warehouse at www.carvingpatterns.com.