 A Different Take on a Classic Scene
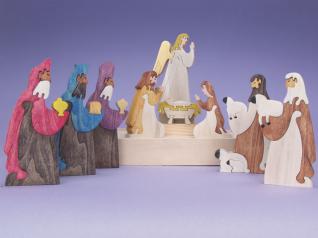
The Nativity is an enduring symbol of the Christmas season. My Nativity scene is unique, as each figure is a small puzzle. It makes a wonderful addition to your holiday season décor, and you might just want to find a special place in your home to display it all year long. The set sells very well at craft shows, and it makes a unique and wonderful gift. Please note that because of the small pieces that pose a choking hazard, the puzzle set is not intended to be a child’s toy.
Step 1: You can complete one set of these figures from a board with the dimensions stated in the materials list. However, I rarely use a single board to produce these sets. The small figures allow you to use scraps you might normally throw away. Use temporary bond spray adhesive to adhere the patterns to the wood. Spray the pattern and not the wood. If the adhesive goes on the wood first, it’s next to impossible to cleanly remove the pattern. Mount the manger piece at the top or bottom of the board.

Step 2: Cut each figure along its base to make nine individual working pieces.

Step 3: Using a #5 skip tooth blade, cut the waste from the outside of each figure. Take care when cutting around the thumbs of the figures with praying hands. You may want to use a #2 blade if you aren’t comfortable using the #5 blade.

Step 4: Begin cutting the individual pieces of each figure. It is best to start from the top and work your way down the figures (faces, then beards/heads, sheep, cloaks/robes/wings, detail lines of cloaks/robes/wings). Again, the #2 blade can be used if you aren’t comfortable using the #5.
Step 5: Remove the paper patterns from the cut pieces. This step can also be done as you go during Step 4.

Step 6: Sand the pieces using 150-grit sandpaper. I like to do each individual piece by holding the sander upside-down and bringing the pieces to the sander (watch your fingertips). You may, however, choose to sand each figure in one step. Simply assemble the figure, place it flat on a non-skid surface, and sand each side of the assembled figures. Be careful; the smaller pieces have a tendency to jump out.

Step 7: Use a folded or rolled piece of sandpaper held at a slight angle to remove any “fuzz” that may be left on the back edges of the pieces.
Step 8: Use a tack cloth or compressed air to remove the dust from the pieces.
Step 9: Using the color key, stain each piece of the puzzle according to the stain manufacturer’s instructions. Let the stain dry completely, as some of the stained pieces will receive painted details.
Step 10: Using the color key, paint the appropriate pieces.
Step 11: Using a very fine paintbrush or fine tip paint pen, draw a small diagonal black line to represent the eyes of each figure. A light touch is needed here!
Step 12: Apply a clear coat of your choice, if you desire.
Special Sources
Aniline dye is available from fine woodworking stores and such businesses as Woodworker’s Supply Inc. www.woodworker.com or phone toll-free, 800-645-9292 or Constantine’s Wood Center, www.constantines.com.
To learn how to use aniline dyes, visit “Finishing Your Wood Project” by Lora S. Irish on her Classic Carving Patterns website, www.carvingpatterns.com.
Materials
|
Tools
|
Attachments
Nativity Scene Puzzle pattern