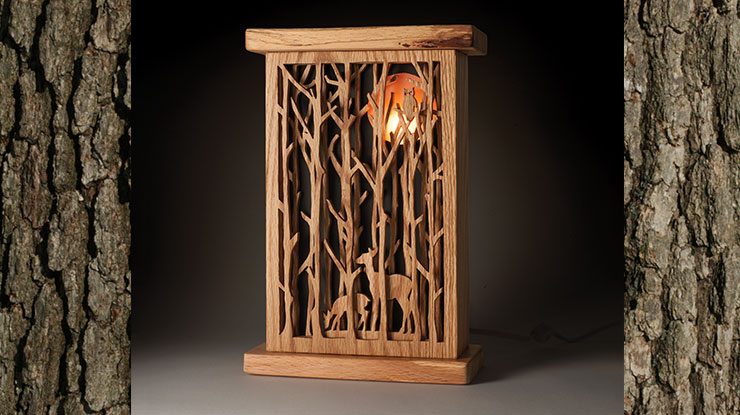
Enjoy the harvest moon year ’round
By Deb Nicholson
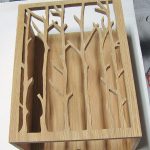
This nightlight, which combines basic woodworking with fretwork accents, makes a nice accent piece for the evening. The frosted spray and black paint on the acrylic plastic diffuse the light and give the full moon a subtle glow. If you would like more light, skip the black and just apply the frosted spray to the plastic and mount the light at the bottom of the box.
Many spray paint and spray finish manufacturers, including Krylon and Rustoleum, offer a spray frosting finish for glass. Regardless of the brand, I’ve found that it requires several coats to get the look I want.
Getting Started
Cut the pieces to size. Transfer any necessary patterns to the appropriate blanks; I use carbon paper to trace the designs onto the blanks.
Materials & Tools
Materials:
• Oak, 1/4″ (6mm) thick: 11″ x 34″ (279mm x 864mm)
• Oak, 3/4″ (19mm) thick: 4″ x 20″ (102mm x 508mm)
• Clear acrylic plastic, 1/16″ to 1/8″ (2mm to 3mm) thick: 6 1/2″ x 11″ (165mm x 279mm)
• Night light: snap-in candelabra-style socket
• Glass frosting spray
• Spray paint: flat black
• Finish: clear matte
• Sandpaper
• Wood glue
Tools:
• Drill with bits: 1 1/8″ (29mm) dia.; assorted small
• Scroll saw blades: #2
• Palm sander
• Small files
• Clamps
 |
1. Cut the fretwork. Drill blade-entry holes with a small bit and cut all of the frets in the front (A), layer 2 (B), and layer 3 (C). Sand the pieces smooth, and use small files to clean up the tight corners. |
 |
2. Assemble the outer box. Cut the notch in the bottom of the back (I) for the cord. Glue and clamp the front (A) and back (I) to the sides (E). Allow the glue to dry, and then sand the joints and edges. Attach the gluing blocks (K) flush with the bottom of the back on both sides. |
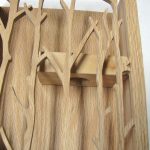 |
3. Add the nightlight holder (D). Drill the 1 1/8″ (29mm)-diameter hole. If you don’t have a bit that size, drill a blade-entry hole and cut the hole on the scroll saw. If your acrylic plastic shade (J) is thicker than 1/8″ (3mm), reduce the width of the nightlight holder (D) to accommodate the thickness of the acrylic plastic. Glue the holder to the inside of the back (I) 3 1/2″ (89mm) from the top and against the right side. |
 |
4. Assemble the top (F) and bottom (H). Sand the pieces and round the corners slightly. Refer to the drawing and glue the top liner (G) to the top. |
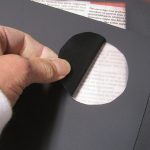 |
5. Prepare the acrylic plastic shade (J). Cut the acrylic plastic shade (J) to size and check the fit inside the box. Sand the edges if it is a tight fit. Apply several coats of frosting spray until you can no longer see through the plastic. Cut a piece of masking tape or contact paper the size of the moon and stick it to the plastic. Spray the plastic with flat black paint. Allow the paint to dry, and then remove the mask for the moon. |
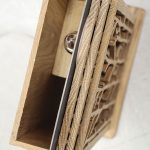 |
6. Assemble the nightlight. Mask off the glue joints on the bottoms of the front, back, and sides, and the bottom. Apply a clear matte finish to the project. Let the finish dry. Then, insert the nightlight into the holder from the bottom. The photo shows how the nightlight fits into the holder, but remember, your holder is already glued into the box. Thread the cord through the hole in the back, and then glue and clamp the bottom to the sides and the gluing blocks. Reinforce the glue joint with screws or small brads into the gluing blocks. Slide the panels and plastic into place, and add the top. |
Download the patterns below.
About the Author
Deborah Nicholson grew up in Chicago, and has lived in Hernando Beach, Fla., since the late 1990s. An artist all of her life, she works in various mediums, including mosaics, clay, and paint, and she especially enjoys combining media. Deborah began working with wood by making frames with her father, who is also an artist.
 For this and other great projects, subscribe to Scroll Saw Woodworking and Crafts magazine HERE.
Click HERE to purchase the issue.
Click HERE for more free Halloween projects.