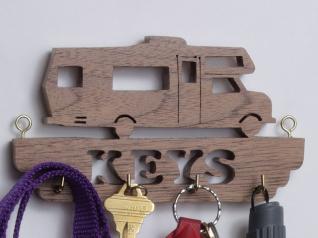
 This particular project provides a solution to a very common problem: keeping track of keys.
More and more people are taking to the highways and byways in all manners of recreational vehicles. You might have one yourself or you probably know someone with an RV. It’s no surprise, then, that scroll saw projects that feature RVs are really quite popular.
This particular project provides a solution to a very common problem: keeping track of keys. Most people don’t like to spend time looking for them and often forget where they left them. If they have a key holder in a convenient location in their home or RV, and get used to using it, the problem is solved.
Step 1: Photocopy the pattern, spray it with temporary bond adhesive and adhere it to the wood of your choice. The RV shown in the photo is a Class C vehicle. Patterns for other styles of RVs are available on our website in the downloadables section.
Step 2: Using the 1/16″ drill bit, drill blade entry holes in all the interior cut areas. Don’t forget the wheel well areas just above the wheels.
Step 3: With the #5 skip tooth blade, cut out all of the interior cuts first. Then cut around the outside of the pattern.
Step 4: Remove the pattern from the wood and sand lightly, using the 120-grit or finer sandpaper.
Step 5: Using the 1/16″ bit, drill holes below the word “KEYS” for the L-shaped hooks, as marked. These hooks are used to hang your keys on. If you wish to have more hooks or fewer hooks, space them evenly across the lower portion.
Step 6: To add detail, create the outlines of the doors and storage space in the motor homes by drilling the smallest hole possible to accept a #5 blade, then make cuts as needed.
Step 7: With the same bit, drill a hole centered in the top of each end for eye hooks. These hooks are used for hanging the holder. The eye hooks can be positioned directly on nails or picture hangers. (You can thread ribbon, cord or a thin chain through the hooks and hang the whole thing from a nail, but this method does not work well due to the uneven distribution of weight.)
Step 8: Apply a clear finish to all sides of the key holder. I prefer to use one coat of Behr interior water-based sanding sealer finish in brush-on form. Sand lightly with 240 grit when dry. Then add two coats of Flecto Varathane water-based #2000-41. Allow to dry for three to four hours between the application of each coat.
Step 9: Install the eye hooks and the key hooks, and your key holder is ready to use.
Materials
- 5/16″ to 5/8″ x 81/2″ x 31/2″ wood of choice (oak, walnut, maple or cherry)
- Temporary bond spray adhesive
- Sandpaper, 120 and 220 grits
- 2 gold screw eyes, approximately 5/16″
- 4 L-shaped 7/16″ hooks
- Clear finish
- Sanding sealer
- Flecto water-based Varathane #2000-41
Tools
- #5 skip tooth blade
- Drill with 1/16″ bit
Attachments
Key Holder pattern