 A Wild Country Christmas Wreath
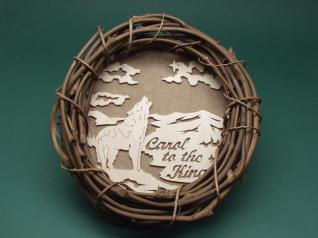
Capture the simple, calm feeling of the Western outdoors with this country Christmas wreath. Its natural earth tones set it apart from the glut of red and green decorations sure to flood craft booths and mall shelves this holiday season. Wildlife lovers, too, will be drawn to the image of a timber wolf singing to the Christmas star in honor of a new birth on that holiest of nights long ago.
Step 1: Begin by cutting two 10″-diameter circles: one out of the 1/8″ Baltic birch, and the other from 1/4″ regular plywood.
Step 2: Now transfer the wolf pattern to the 1/8″ Baltic birch plywood either by tracing it with graphite paper or gluing the pattern directly to the wood using rubber cement. If you’d rather use temporary bond spray adhesive, feel free to do so. I prefer using the graphite paper since spray adhesives and I don’t get along real well; I tend to be a bit messy at times. The full-size pattern is found on the pull-out pattern section.
Step 3: Using the 1/32″ bit, drill the blade entry holes. You can use either a hand drill or a drill press.
Step 4: Thread a #5 reverse tooth through one of the holes and begin sawing. Make sure you saw the more delicate features first. I recommend sawing in this order: the lettering, the inside of the wolf’s body, the Christmas star, the clouds and the background cutouts such as the mountain, trees and foreground.
Step 5: Add the background color. Evenly spread the Elmer’s glue on one side of the 1/4″ plywood background and attach the suede leather, the felt or other fabric you have chosen. I chose the natural suede to keep the whole piece as natural as possible and to maintain the rustic, warm country feel. Other good color choices include dark maroon or dark green; they’re subdued version of the generally bright red and green Christmas colors.
Step 6: Glue the scrolled front piece to the plywood background that you have covered with leather or wood. Elmer’s glue works well for this step. Be careful that you don’t use too much or it will bead up at the edges and ruin the piece.
Step 7: You’re almost done. Drill a hole at the top, bottom, left and right edge of the circle approximately 1/4″ from each edge. These holes allow you to thread your soft craft tie wire through the piece to attach the plywood circles to the back of the grapevine wreath. Determine the best look of the grapevine by holding it together with the sawn piece and rotating the vine until you see a pleasing arrangement. Thread the wire through the holes, then around a couple of the vines, and twist tie the ends. Fold the twisted ends after cutting back into the vine to remove sharp edges that might damage your skin, clothing or the area where the wreath is hanging.
Step 8: Determine the balance point so when the wreath is hung, the writing is parallel to the floor. Add a small sawtooth picture hanger on the back and hang your wreath.
Materials
- 1/8″ x 10″ x 10″ Baltic birch plywood
- 1/8″ or 1/4″ x 10″ x 10″ plywood
- 10″ natural finish grapevine wreath
- Soft craft tie wire
- Suede leather or colored felt
- Hobby glue (Elmer’s or equivalent)
- Sawtooth hanger
Tools
- #5 reverse tooth blade
- Drill with 1/32″ bit
Attachments
Pattern Download