


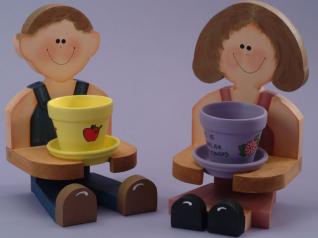
 Brighten Your Garden or House with this Pair – Perfect for Indoors and Out
This project was inspired by a design created by my wife’s uncle, Bill Carlson. He designed an old-fashioned wall-mounted telephone that held an old telephone line insulator. I thought the idea would work nicely as a way to hold a small potted plant. Of course, these flowerpot holders work fine just sitting on a shelf in your sunroom or garden.
The “flowerpot kids” make a nice starter project for those who are just getting into scrolling and woodworking. Either hardwood or softwood can be used for this project. I suggest using softwood if you plan to paint the holders. Birch and maple, however, are hardwoods that accept paint well. The wood called for in the MATERIALS & TOOLS list is readily available at your local lumberyard or do-it-yourself center. If you haven’t purchased wood before, see the TIP box for some solid advice.
Tip: Why Do I Buy a “1x ” Board for 3/4″ Wood?
The Flowerpot Kids project is designed to fit a standard 1 x 6 board. However, if you measure the thickness and width, you;ll find that this size board is actually 3/4″ thick x 5 1/2″ wide. The “1 x” or “2 x” designations are called nominal sizes and are used by the lumber industry to categorize wood sizes.
Step 1: For the flowerpot holder size as shown, photocopy the pattern found on the pull-out pattern section. Each boy/girl requires one upper body copy, one leg copy, one lower arm copy (the lower arm is the same for the boy and girl), and two copies of the corresponding shoes.
Step 2: Spray the patterns with temporary bond spray adhesive and adhere the patterns to the wood. Use a #5 reverse tooth blade to cut each individual shape. 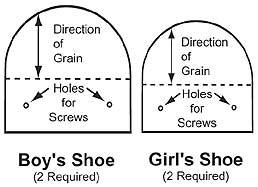
Step 3: In the heels of the shoes, drill the 3/8″-diameter holes 1/4″ deep with the Forstner bit. Then drill the 5/32″-diameter shoe shank hole. Use the 3/32″-diameter or 7/64″-diameter bit to drill the pilot holes for the screws that will attach the leg to the body. If you’ve selected softwood for the legs, use the 3/32″-diameter bit. If you’ve chosen hardwood, then go with the 7/64″-diameter bit.
Step 4: Drill the 5/32″-diameter shoe shank holes through the bottom of the leg section as indicated on the drawing. The 3/32″- or 7/64″-diameter bits are used to create pilot holes into the bottom of the body. Countersink the 5/32″-diameter holes deep enough so the flathead screws are flush with the surface of the wood.
Step 5: Drill the 5/32″-diameter shank holes through the bottom of the lower arm section where it is attached to the bottom of the upper arms on the body section. Countersink these holes on the bottom side deep enough to allow the heads of the screws to be recessed. Using the 3/8″-diameter Forstner bit, drill a hole 1/4″ deep on each side of the lower arm section where screws go into the sides of the upper body. Then drill the 5/32″-diameter shank holes at the same locations. It may be easier to drill these holes before cutting out the rectangular inset in the back of the lower arm section. The wood helps support the force of the drill.
Step 6: If you’re not going to hang the holders, skip this step and move on to Step 7. If you choose to mount the holders using the same hanger I did—part #27K05 from Woodcraft®— then you’ll need to prepare holes for the hanging device. Drill a 1″-diameter and a 5/8″-diameter hole on the back of the upper body portion. The Hanging Device illustration shows the positions of these holes. Use the 1″-diameter Forstner bit and drill a hole 1/16″ deep. At the same location, drill a 5/8″-diameter hole an a dditional 1/4″ deep using the 5/8″-diameter Forstner bit. 
Step 7: Once all the pieces are cut and the holes are drilled, sand the pieces with 100-grit sandpaper. When the sanding is complete, clean the dust off the pieces with a tack rag.
Step 8: Now you are ready to assemble the boy and girl. Attach the lower arm piece to the body first. By following this instruction, you will avoid the possibility of the leg section getting in the way of drilling pilot holes and installing the screws. Apply a little wood glue where the wood joins, drill the necessary pilot holes and install the screws. The 2″-long screws go in the side of the arm piece into the side of the body. The 11/2″-long screws are used to attach the bottom of the lower arm piece to the upper arm of the body. Remember to drill the necessary pilot holes and apply a little beeswax to the threaded portion of the screws.
Step 9: The shoes can then be attached to the leg portion with a little wood glue and the 11/2″-long screws. Once the shoes are attached to the leg section, the leg section can be attached to the body. Because this will be a painted project, I chose to use screws rather than glue for attaching the parts so it will make painting easier.
Step 10: Apply a small amount of glue to the inside areas of the 3/8″-diameter holes and insert the 3/8″-diameter wood plugs to hide the screws. After the holder is assembled, allow it to dry overnight.
Step 11: Once the glue is dry, the protruding portion of the wood plugs can be cut off and sanded smooth. The hanger can be attached to the back. If you are using the Woodcraft hanger, you may want to use screws in lieu of the nails provided to attach the hanger. I used two #0 x 1/4″-long screws to hold the hanger on. 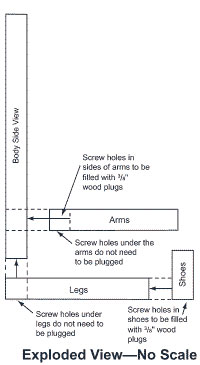
Step 12: The flowerpot holders and the pots can be finished to suit using the supplied color scheme or use your own imagination and taste.
Materials:
|
Tools:
|
Tip: Drill Before Cutting
It may be easier to drill holes before cutting out the retangular inset in the back of the lower arm section. The wood will help support the force of the drill.
Tip: Beeswax the Threads
Screws go in easier if a little beeswax is put on the threaded portion of the screws first.
Box Making Projects for the SS | USPC | DVD – The SS A Beginner’s Guide
Attachments
Flowpot Kids Pattern


