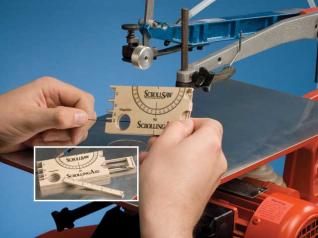
 This clever, pocket-sized device combines six scrolling tools in one.
There are some tools a scroller uses every day. In an organized shop, they are always within easy reach. Unfortunately, my shop is not that organized. I designed this project to combine several of the most useful tools into a pocket-sized Scroller’s Aid.
This device is the size of a business card. The magnifier is great for checking the direction of teeth on tiny scroll saw blades. The small ruler doubles as a depth gauge. There is a series of thickness gauges for standard dimensions and a protractor to ensure your saw table is at the correct angle in relation to the blade.
On the back of the aid is a chart showing what size blade to use, based on the wood thickness, and what size drill is required to drill blade-entry holes for the different blades. This gadget also includes a handy drawer to store tiny numbered drill bits that seem to disappear so often.
The key to the accuracy of this aid is in the transfer of the pattern and the cutting of the project. Start by sanding the plywood with 220- grit sandpaper.
Heat transfer patterns
There are a couple of ways to transfer patterns to wood with heat.
The first is to transfer the toner from a photocopy or a laser printer to wood by using a clothes iron. Toner is fused at a temperature around 400º, but some copiers and printers use a fusing oil, which will impede this process.
The second is T-shirt transfers. In my opinion, this method is better, because it gives the finished project a protective finish. T-shirt transfer paper is designed for inkjet printers. The image is printed in reverse. A reverse image pattern is available for download as article attachment. Place the transfer image-side-down onto the wood. Apply even pressure, and heatit with a clothes iron for 45-60 seconds to release the transfer from the backing paper. I found a medium setting on my iron worked best. Do not remove the backing paper until the transfer has completely cooled. Slip a sharp craft knife under one edge of the paper, and peel it back.
Once you remove the backing sheet, you may find some spotswhere the transfer did not bond well. There will be shiny blotches on the image. Take a piece of grease-proof parchment paper, and place it on the transfer. Reapply heat with the iron. The grease-proof paper will not stick to the image, allowing you to seal the transfer properly.
Materials
- 1⁄8″ x 4″ x 8&frac; ” Baltic birch plywood
- Dollar store telescope lens
- T-shirt heat transfer paper
- Grease-proof parchment paper
- Wood glue
- Sandpaper, assorted grits up to 220 grit
Tools
- #3 reverse-tooth blades or blades of choice
- Inkjet printer
- Clothes iron
- Drill with assorted small drill bits
- Clamps of choice
Attachments
Scroller’s Aid Transfer Download