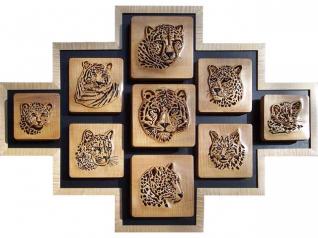

WILDCATS OF THE WORLD, featuring Dick’s carved fretwork technique, took Best of Show in the SAW contest at the 2007 PA Scrollabration.
3D Tiger leaps from the wood
I developed a new technique to bring fretwork portraits to life. This carved-fretwork technique combines traditional scrolling with basic relief-carving techniques. The combination brings the portraits to life with depth and dimension.
Creating carved fretwork is not difficult. The technique enhances the fine fretwork details already present in the scrollwork. By following simple steps, you can use a rotary power carver and a router to add unique texture to your fretwork projects. If you can do the scrollwork, I am confident you can also do the carving.
Realistic wildlife, especially big cats, is my favorite subject, but the technique can easily be adapted to a wide variety of fretwork projects.
For bonus instructions for painting lifelike eyes, see below. For full step-by-step instructions on creating the carved fretwork tiger, see Scroll Saw Woodworking & Crafts, Fall 2008, Issue 32.
The eyes can be left natural, but creating life-like eyes will enhance the appearance of your project. The following technique is a modification of the method developed by Orchid Davis for her woodburning projects. Be sure to let the paint dry thoroughly between each step. To mix the paint with the gloss medium, squeeze out a small amount of the gloss medium and use a toothpick to pick up an equal amount of paint and swirl the two together. Apply the gloss medium mixture in streaks, do not paint the entire eye with the mixture. After the painting process is complete, apply a thick layer of Treasure Crystal Cote to give the eyes a high gloss finish.
3D Tiger Portrait: Painting the Eyes
 |
Base coat the eyes. Paint the eyes with full-strength Naples Yellow Hue, using a very small artist brush. |
 |
Apply a light coat of full-strength Iridescent Bright Bronze over the Naples Yellow Hue paint. |
 |
Add five to six thin streaks of Burnt Umber mixed with gloss medium in a radial spoke pattern with a fine artist brush. |
 |
Add five or six thin streaks of Primary Yellow mixed with gloss medium. Add another layer of the Burnt Umber. |
 |
Repeat steps C and D. Then add five or six thin streaks of Iridescent Bright Bronze mixed with gloss medium. |
 |
Use a toothpick to add five or six tiny specks of champagne glitter paint (Craft Twinkles) to the bottom third of the iris under the pupil. Paint the insides of the pupil with Burnt Umber. |